ServiceNow Connector Example
The OxyNexus ServiceNow connector allows you to access the ServiceNow REST API from an integration sequence. Using ServiceNow connector you can work with Aggregate API, Import Set API, and Table API in ServiceNow. You can read more about ServiceNow REST APIs from here.
What you'll build
This example explains how to use ServiceNow Connector to create records in a table and retrieve its information. Assume your organization uses ServiceNow support and you need to create an incident. In order to do that we can use the tableAPI, which is a REST API. This can be easily done using OxyNexus ServiceNow connector. Whenever you need to raise an incident at ServiceNow, the above API can be called with the required information.
It will have two HTTP API resources, which are postRecord and readRecord.
-
/postRecord: It creates a new record in the existing incident table in the ServiceNow instance. -
/readRecord: It reads the detailed information about the created incident record in the incident table.
If you do not want to configure this yourself, you can simply get the project and run it.
Set up the environment
Please follow the steps mentioned in the Setting up ServiceNow Instance document in order to create a ServiceNow Instance and obtain the credentials. Keep them saved to be used in the next steps.
Set up the integration project
Follow the steps in create integration project to set up the Integration Project.
Create the mediation logic
-
First, create the
PostRecordandReadRecordsequences. Select Micro Integrator and click+on Sequences to create the sequence. -
Provide the Sequence name as
PostRecordand click on Create. It will open a graphical view of the sequence where you can add the mediators and connectors.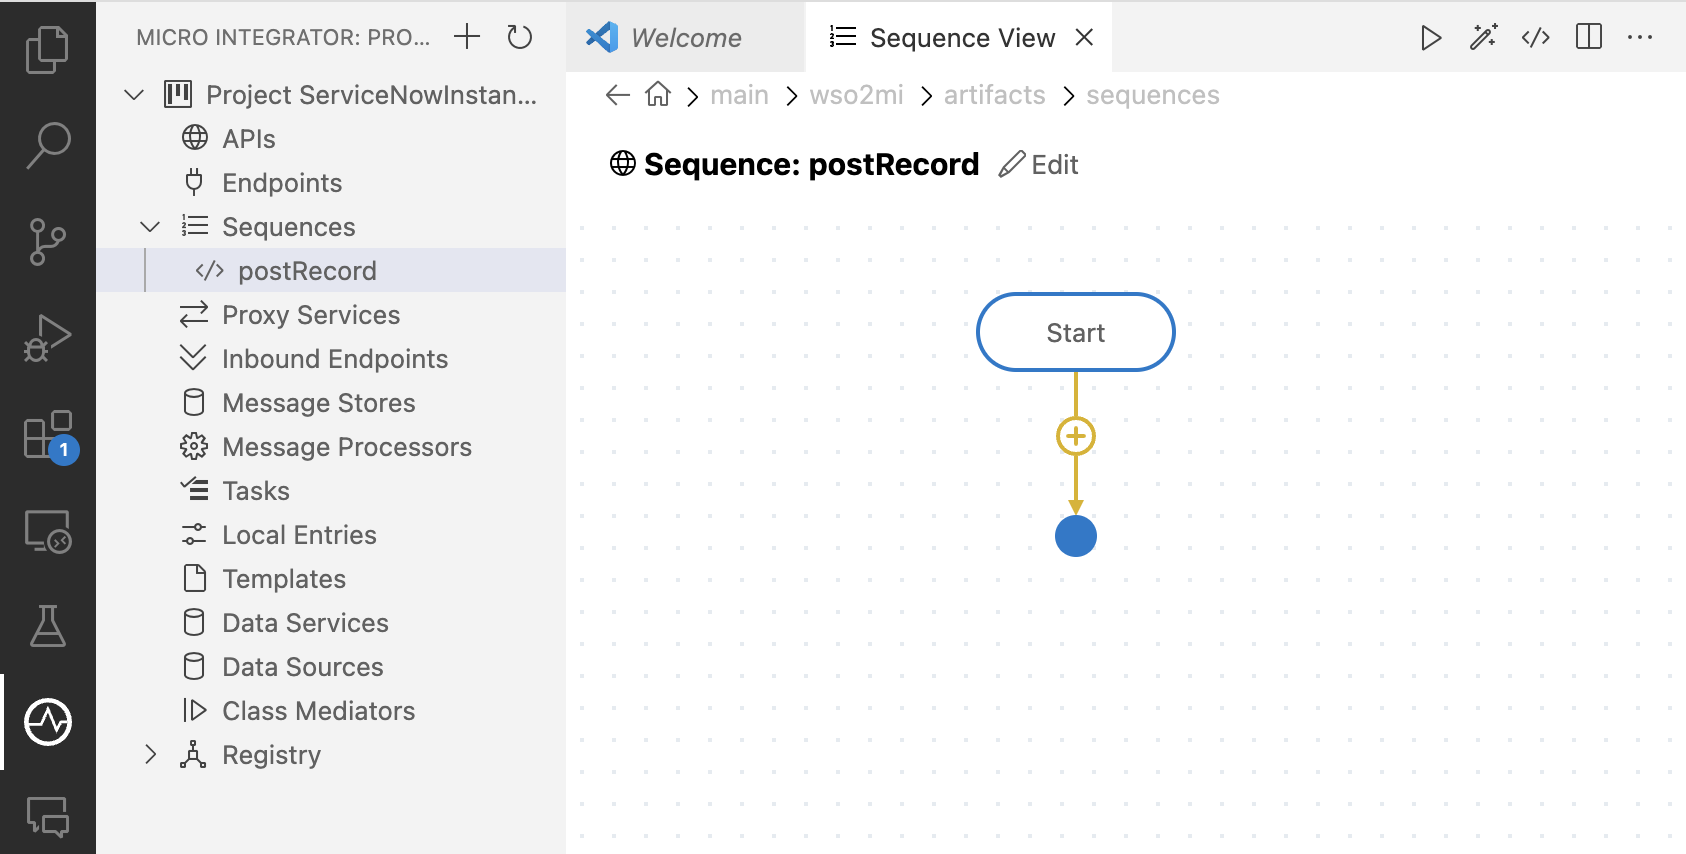
-
In the graphical view click on
+and go to the Connectors tab. Click on theservicenowconnector and select theinitoperation.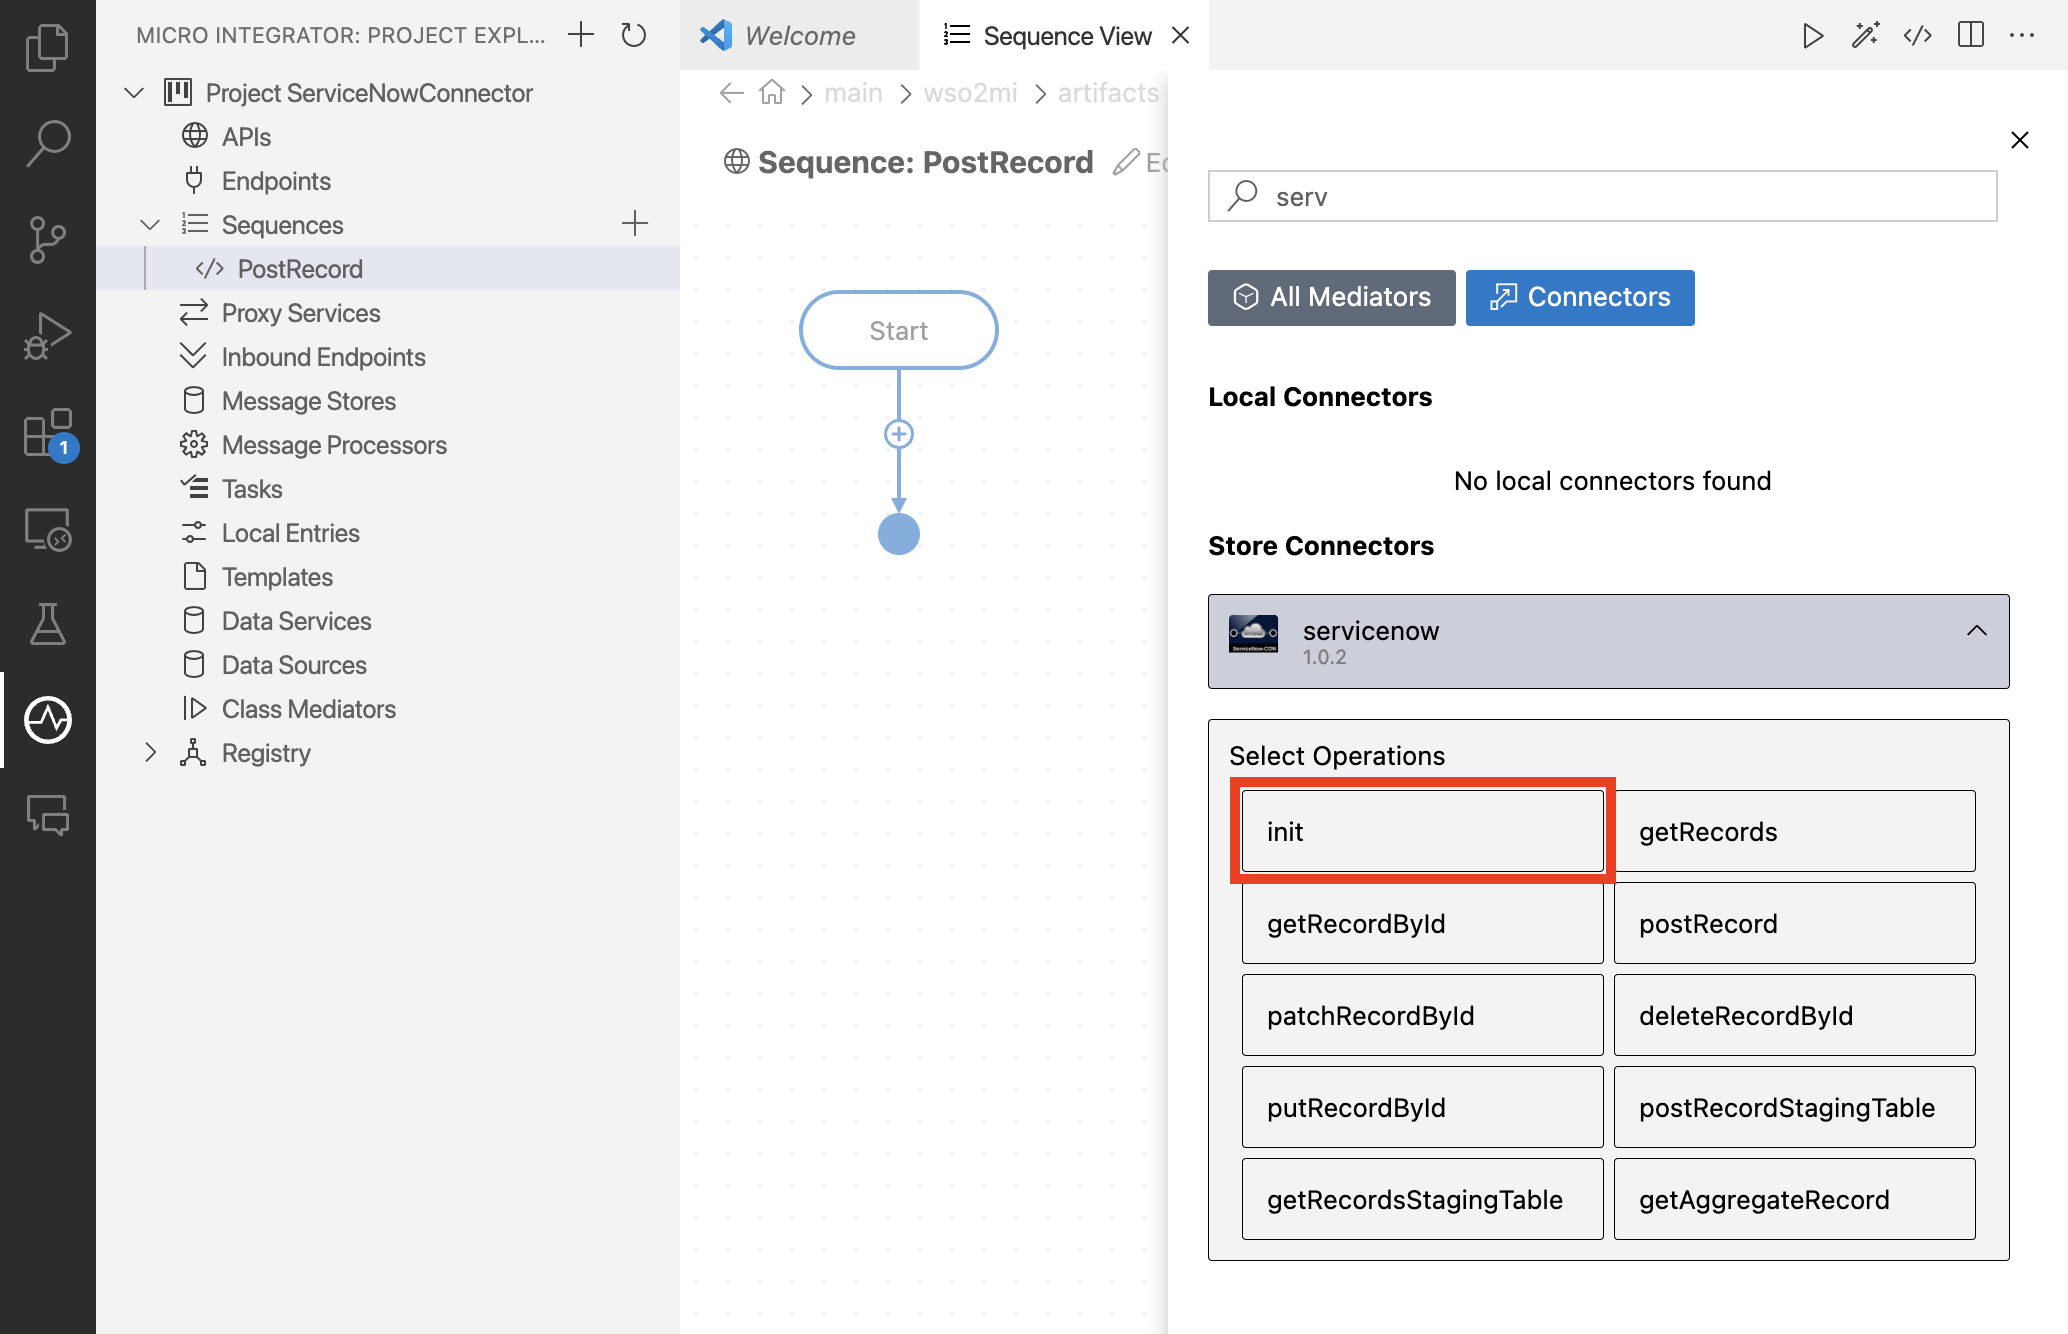
-
Click on
+ Add Parameterand provide the following key-value pairs. You need to use the ServiceNow instance URL, username, and password that you obtained when setting up the ServiceNow instance.Key Value serviceNowInstanceURL https://dev55707.service-now.comusername adminpassword Diazo123@Click on Submit to save the configuration.
-
Now add the
postRecordoperation to the sequence. Click on+and go to the Connectors tab. Click on theservicenowconnector and selectpostRecordoperation.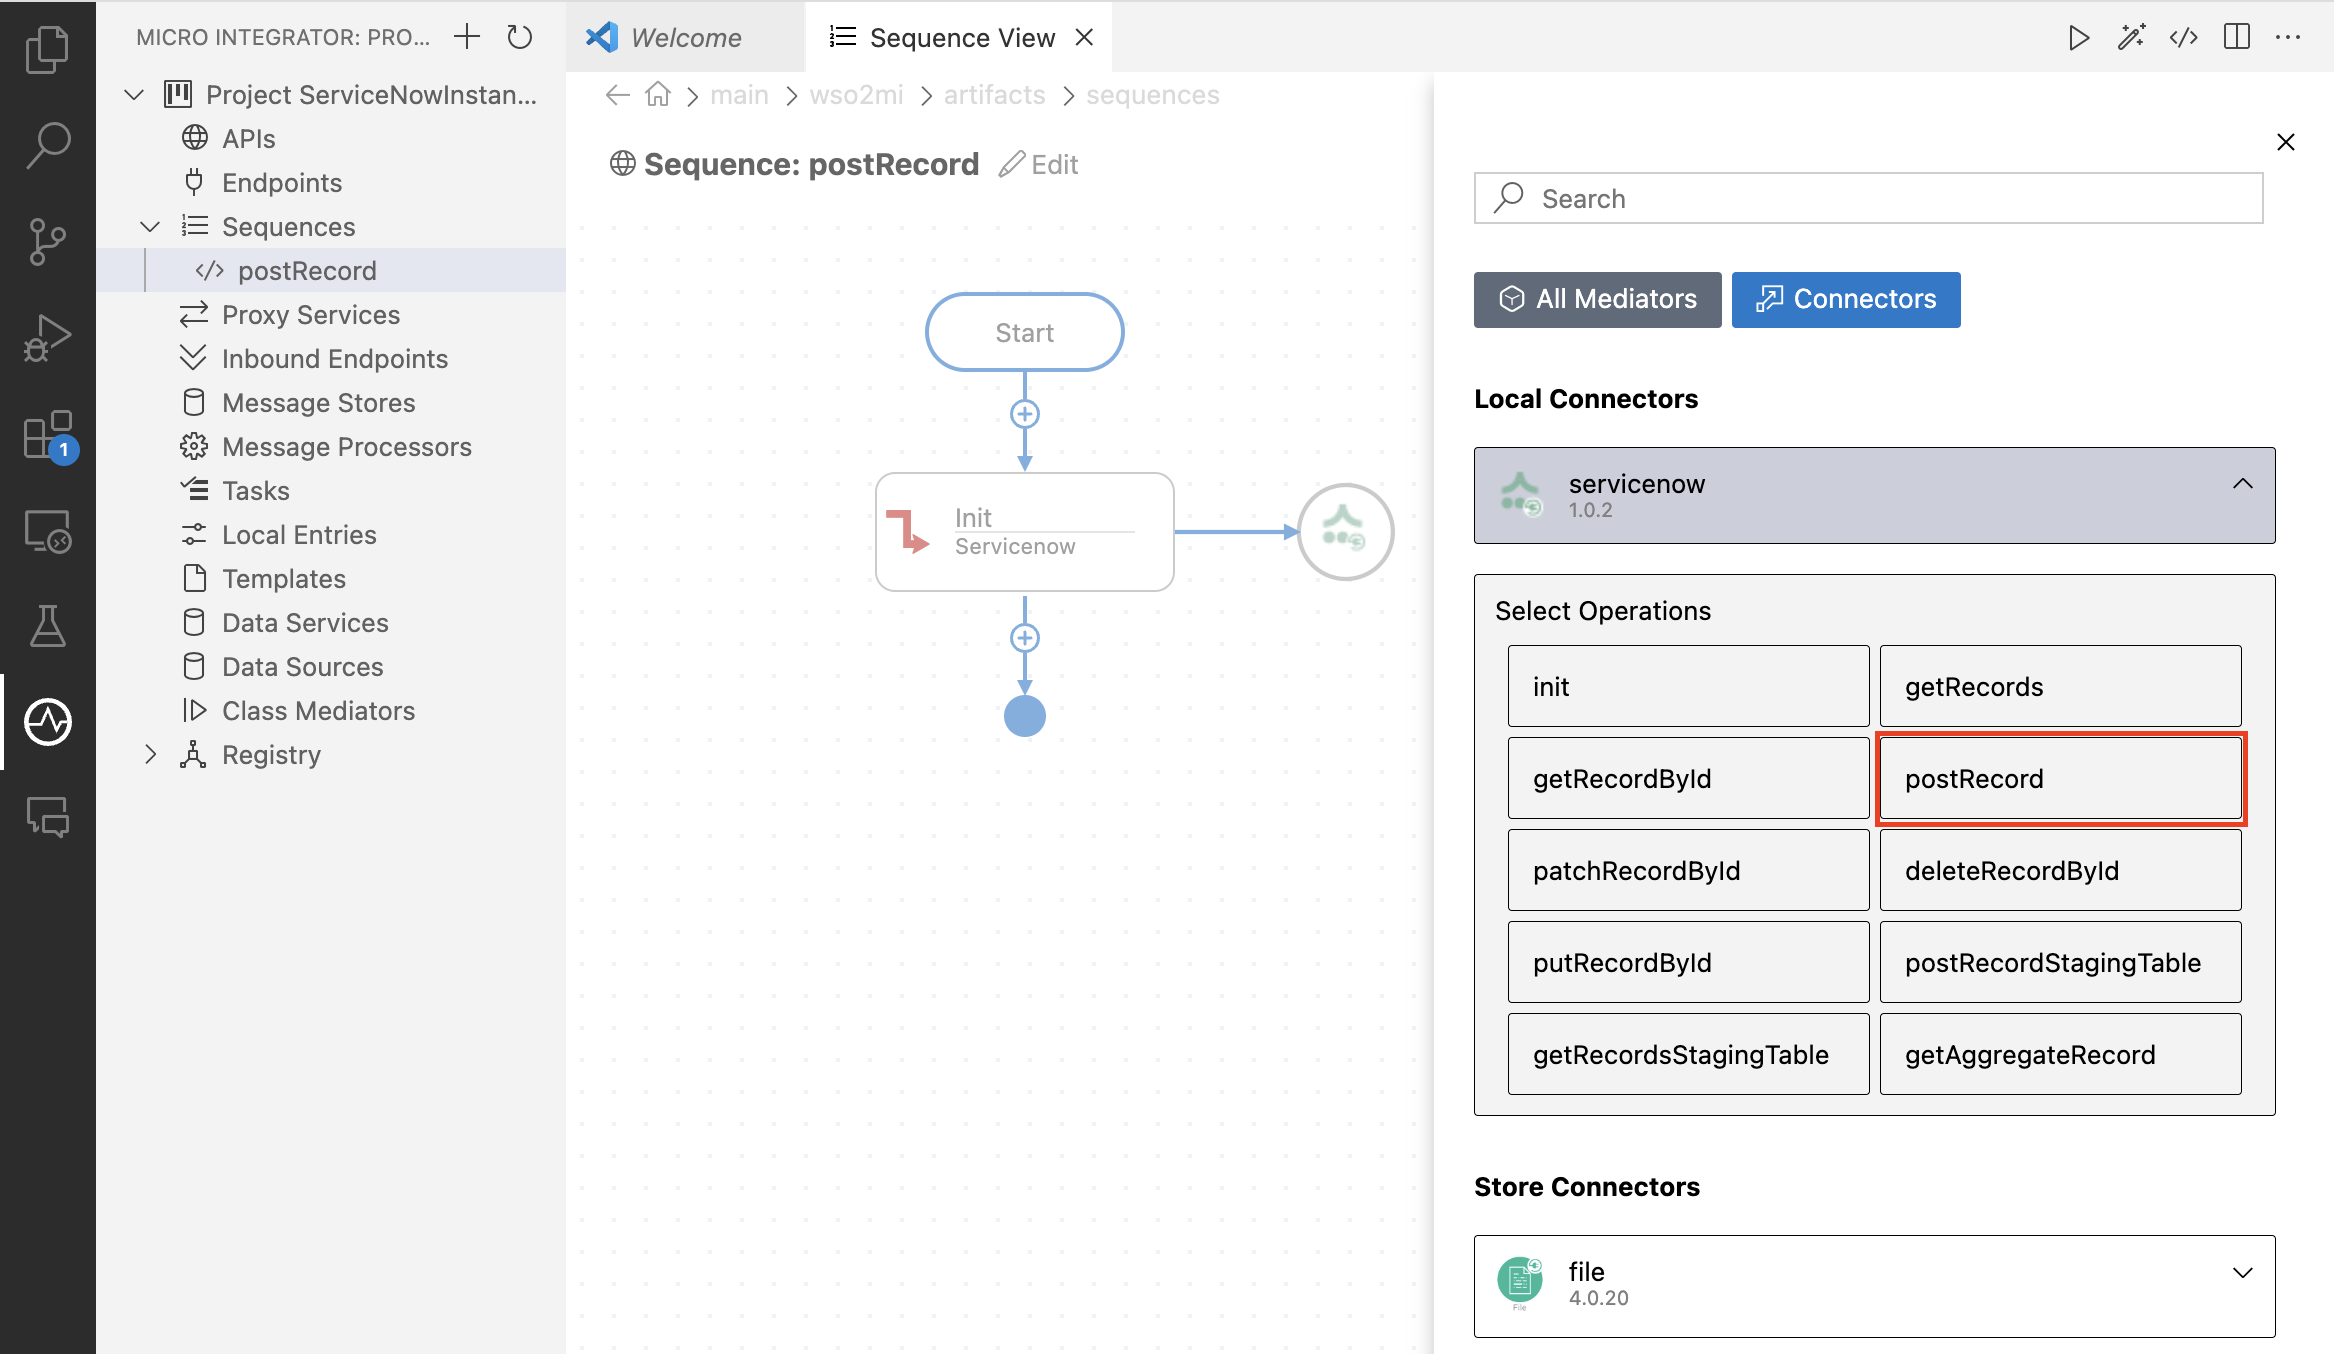
-
Click on
+ Add Parameterand provide the following key-value pairs.Key Value tableName incidentsysparmDisplayValue truesysparmFields short_description,number,sys_idsysparmView short_description,number,sys_idsysparmInputDisplayValue truenumber 34shortDescription {$ctx:shortDescription}active trueapproval ownercategory inquirycontactType {$ctx:contactType}Click on Submit to save the configuration.
-
Add a Property mediator to the sequence to save the
sys_idof the created incident. Click on+and go to the Mediators tab. Click on the Property mediator and provide the following details.Property Value Property Name sysIdProperty Scope defaultProperty Data Type STRINGProperty Action SetProperty Value json-eval($.result.sys_id)When entering the Property Value, make sure to select the EX button to specify the value type as an expression.
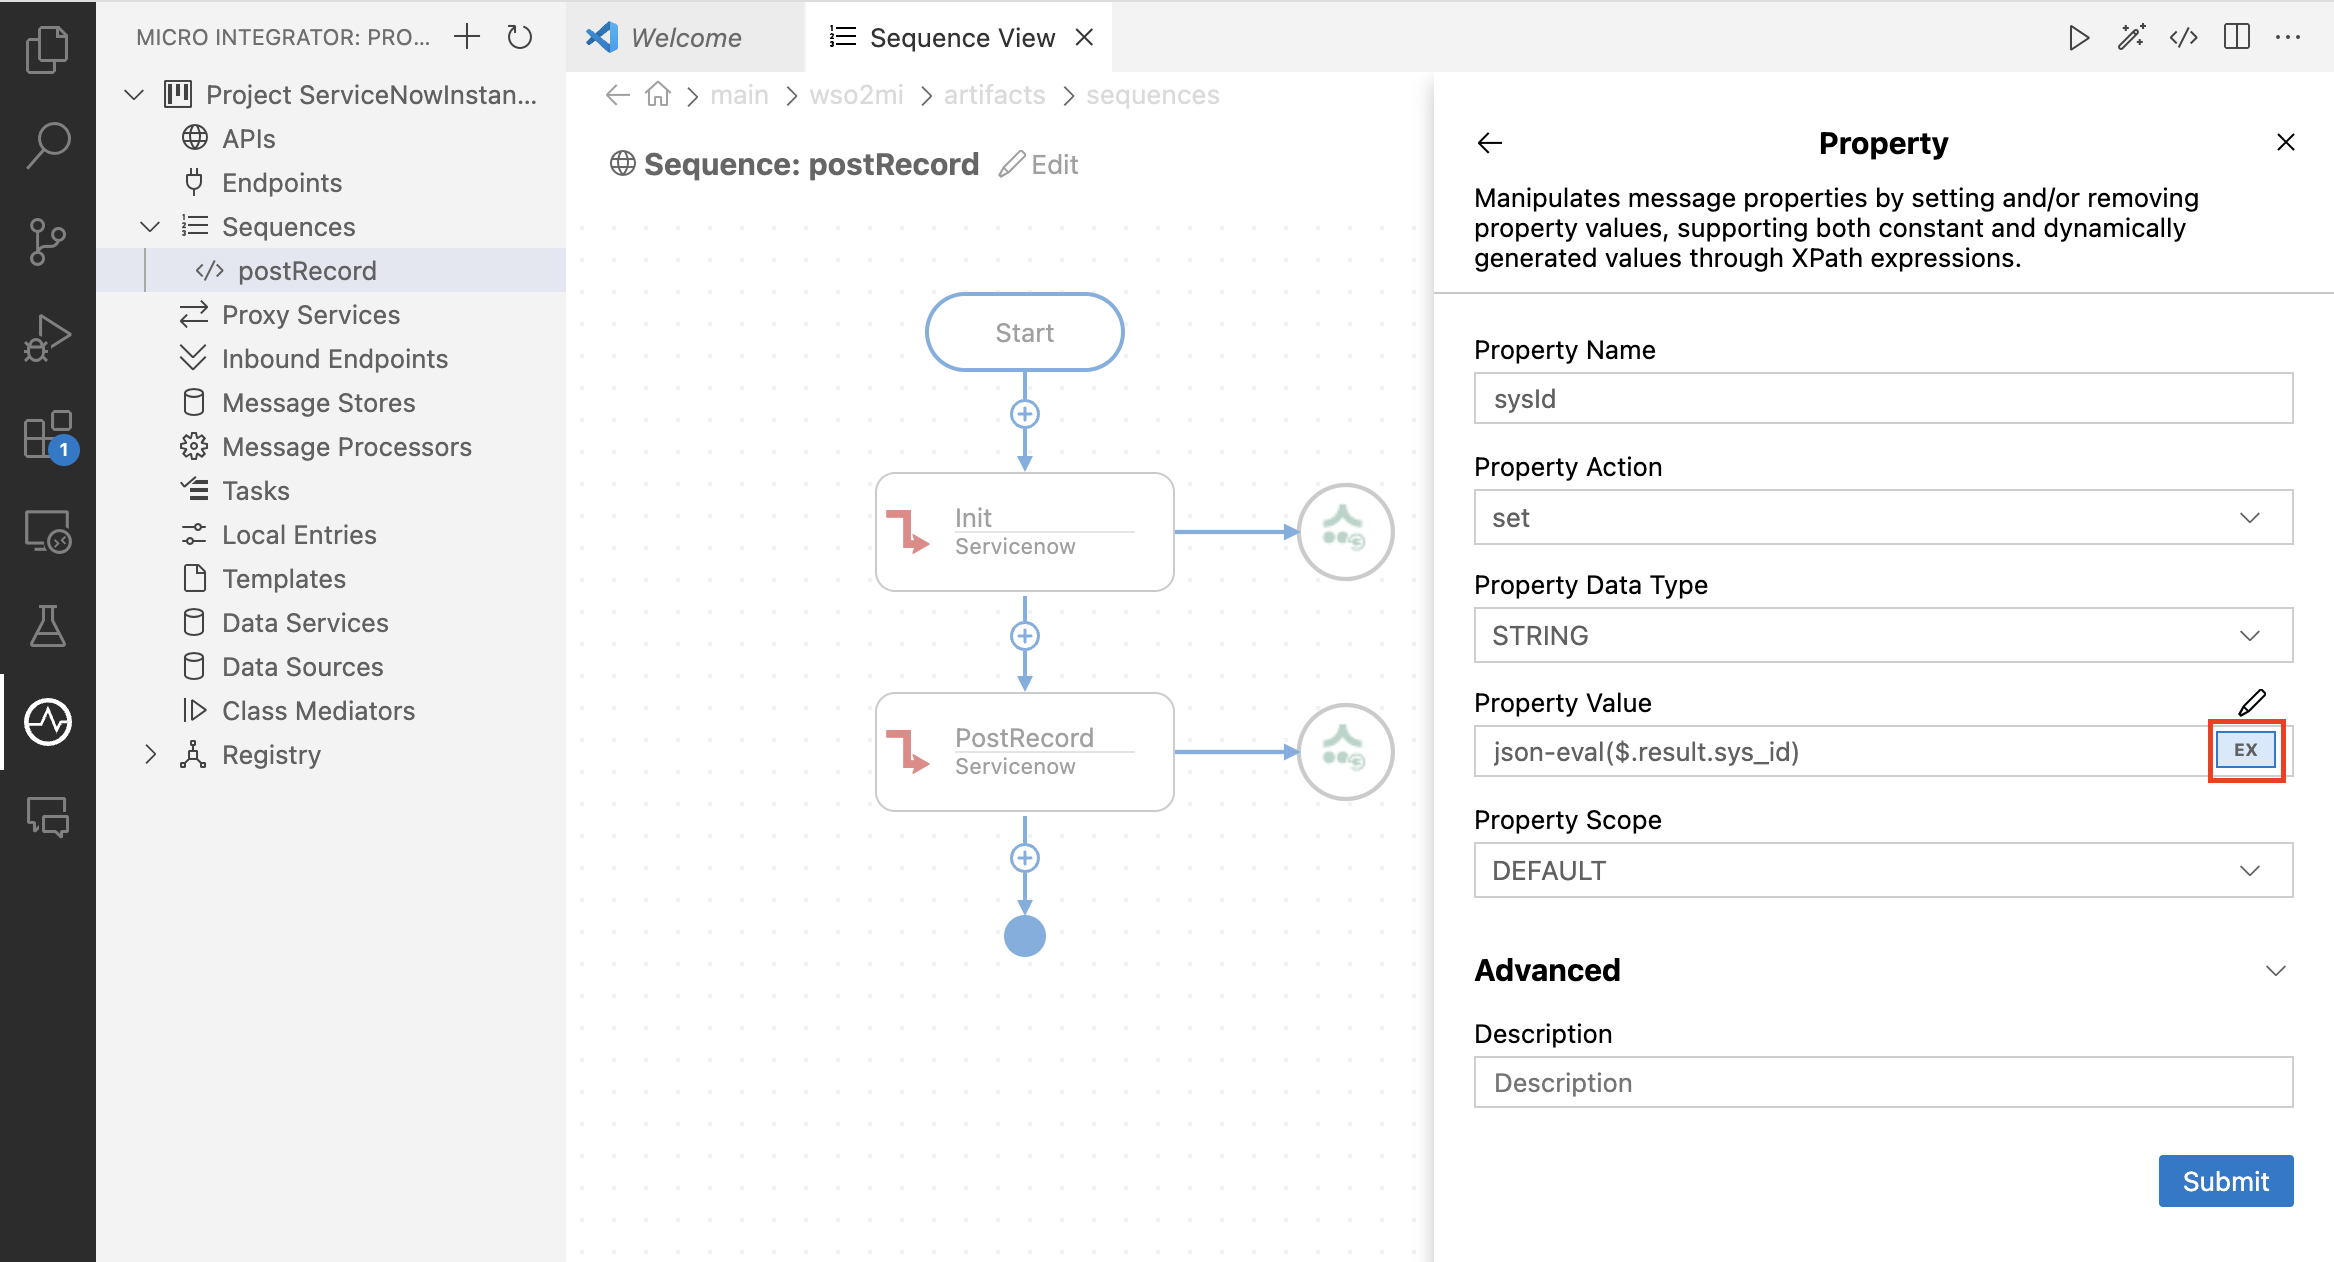
Click on Submit to complete the property mediator creation. Now the
postRecordsequence is created, and you can view the mediation logic in the graphical view and source view as shown below.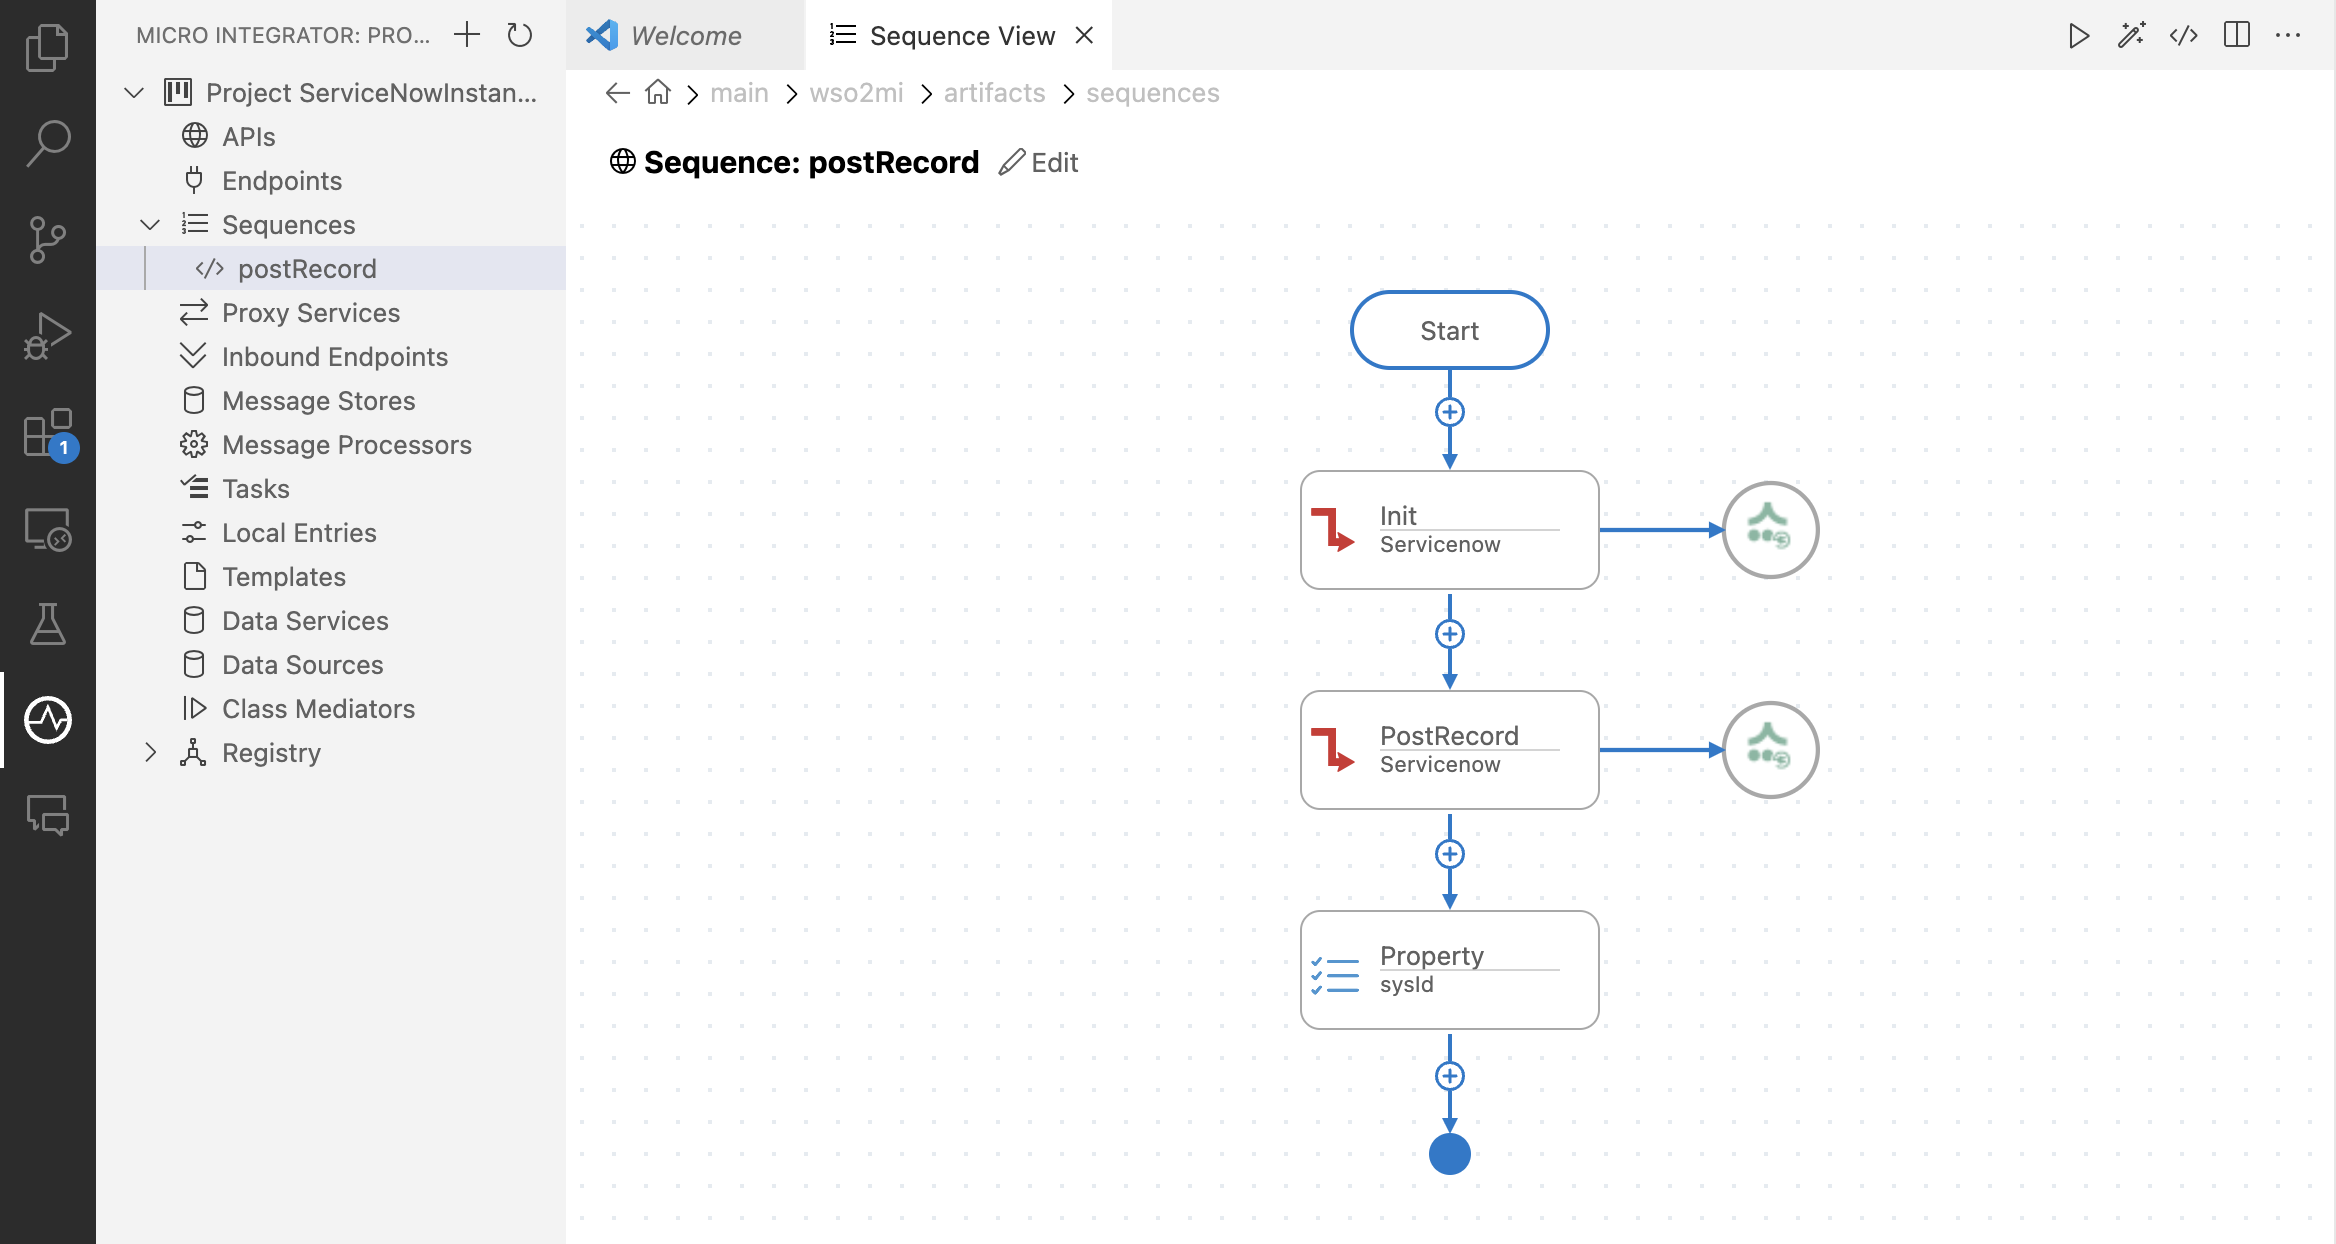
<?xml version="1.0" encoding="UTF-8"?> <sequence name="PostRecord" trace="disable" xmlns="http://ws.apache.org/ns/synapse"> <servicenow.init> <serviceNowInstanceURL>https://dev55707.service-now.com</serviceNowInstanceURL> <username>admin</username> <password>Diazo123@</password> </servicenow.init> <servicenow.postRecord> <tableName>incident</tableName> <sysparmDisplayValue>true</sysparmDisplayValue> <sysparmFields>short_description,number,sys_id</sysparmFields> <sysparmView>short_description,number,sys_id</sysparmView> <sysparmInputDisplayValue>true</sysparmInputDisplayValue> <number>34</number> <shortDescription>{$ctx:shortDescription}</shortDescription> <active>true</active> <approval>owner</approval> <category>inquiry</category> <contactType>{$ctx:contactType}</contactType> </servicenow.postRecord> <property name="sysId" scope="default" type="STRING" expression="json-eval($.result.sys_id)"/> </sequence> -
Similarly, create the
ReadRecordsequence by click+on Sequences. Provide the Sequence name asReadRecordand click on Create. Follow the steps 3 and 4 to add theinitoperation of the ServiceNow connector to the sequence. -
Then add the
getRecordByIdoperation to the sequence. Click on+and go to the Connectors tab. Click on theservicenowconnector and selectgetRecordByIdoperation.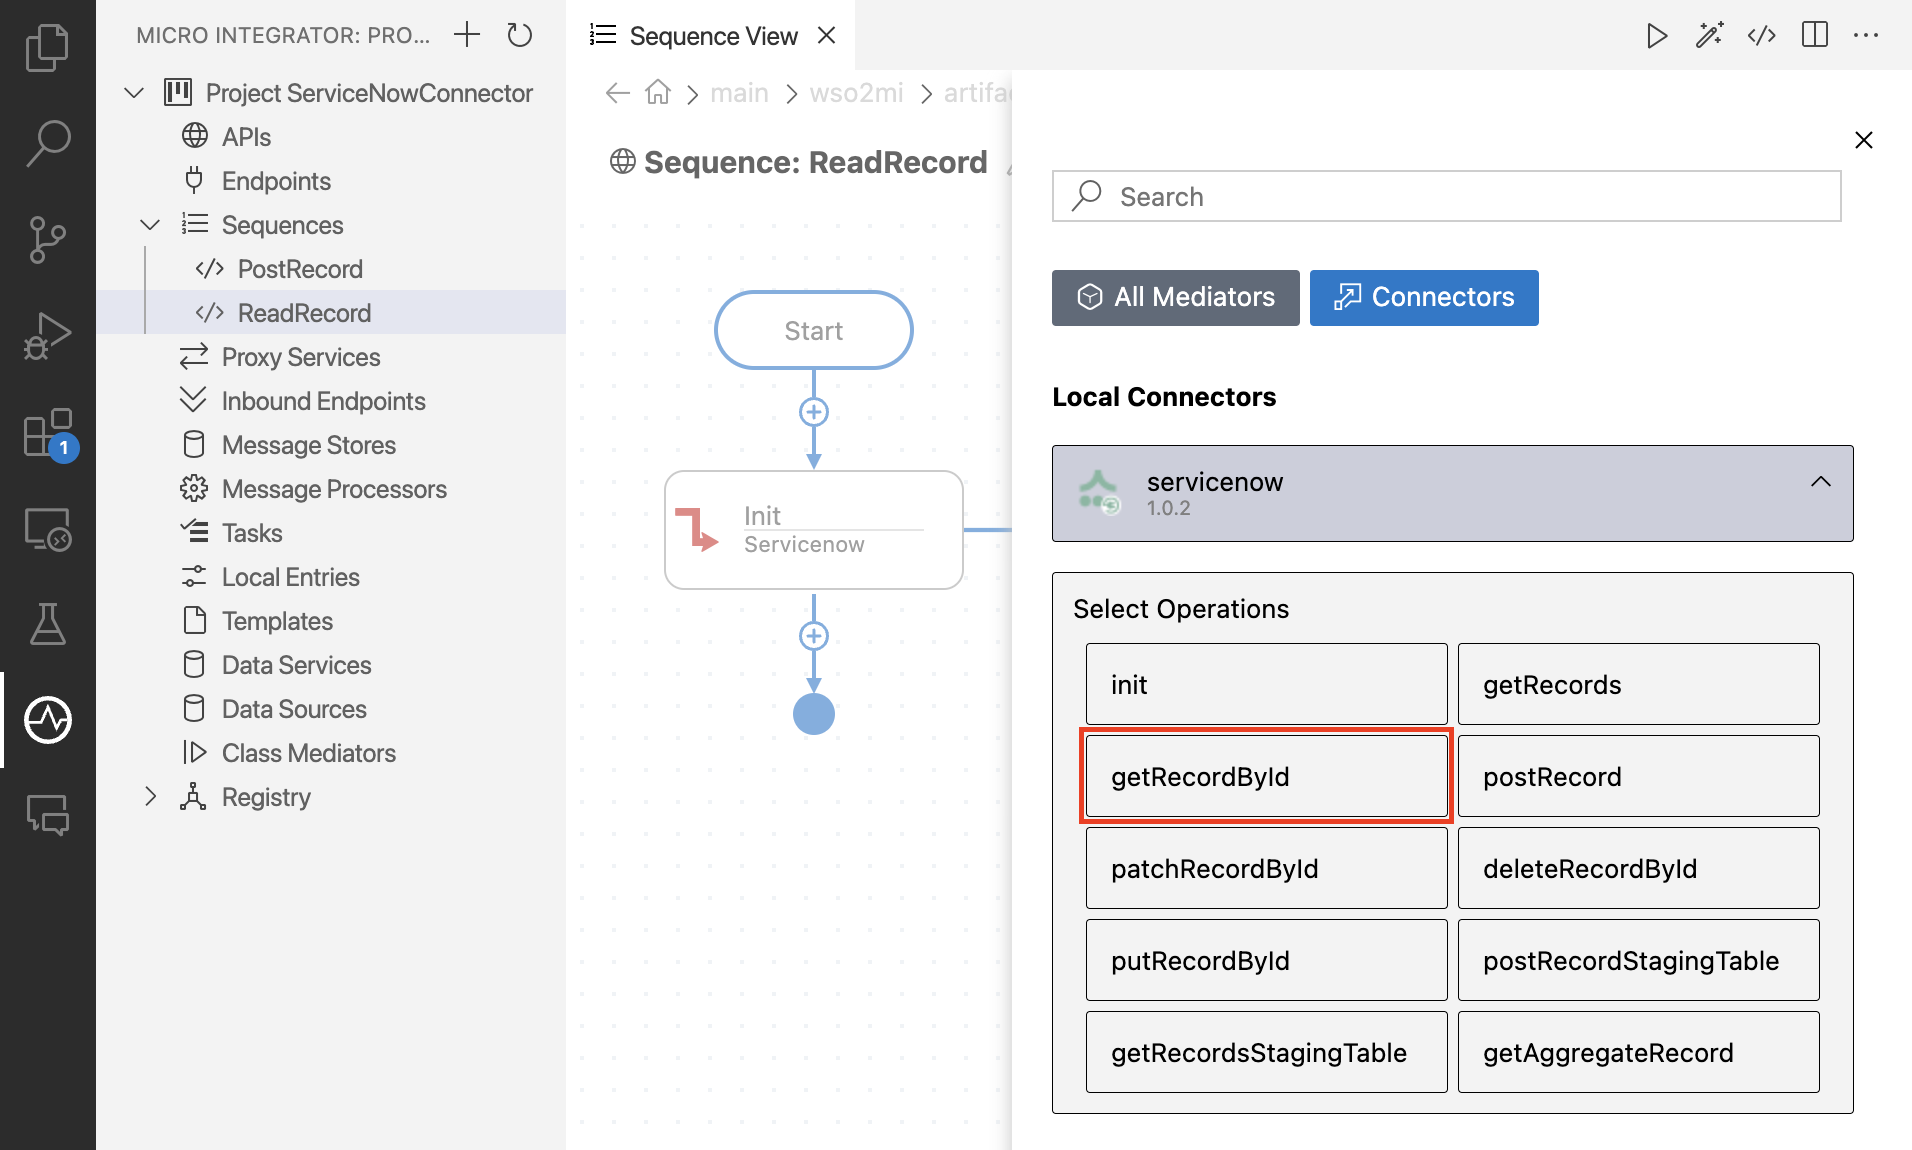
-
Click on
+ Add Parameterand provide the following key-value pairs.Key Value sysId {$ctx:sysId}tableName incidentClick on Submit to save the configuration.
The
ReadRecordsequence is created, and you can view the mediation logic in the graphical view and source view as shown below.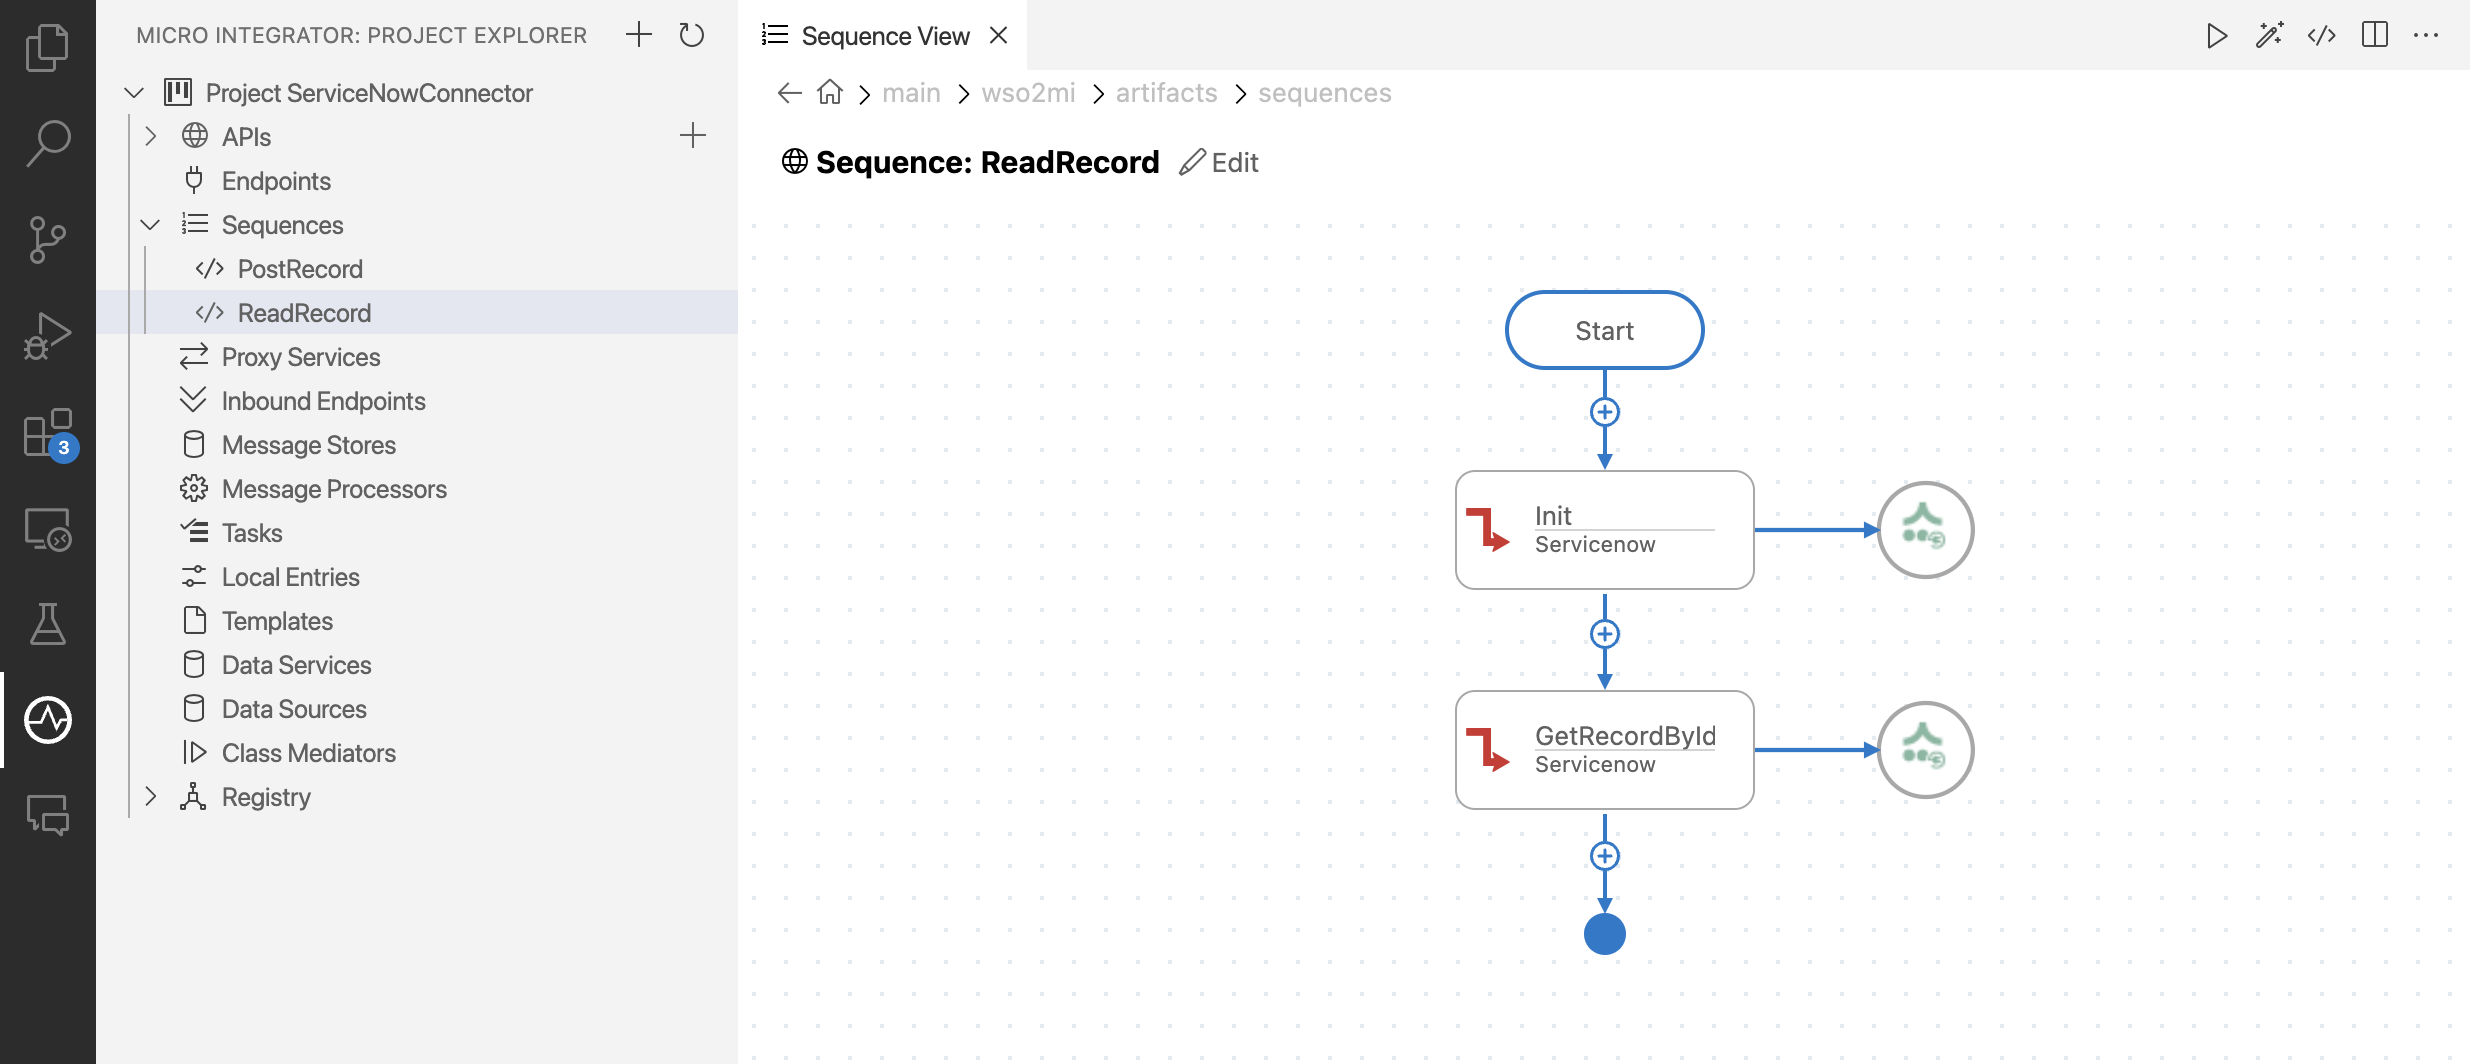
<?xml version="1.0" encoding="UTF-8"?> <sequence name="ReadRecord" trace="disable" xmlns="http://ws.apache.org/ns/synapse"> <servicenow.init> <serviceNowInstanceURL>https://dev55707.service-now.com</serviceNowInstanceURL> <username>admin</username> <password>Diazo123@</password> </servicenow.init> <servicenow.getRecordById> <sysId>{$ctx:sysId}</sysId> <tableName>incident</tableName> </servicenow.getRecordById> </sequence> -
Now let's create the REST API to expose the above sequences. Click on
+in APIs and select New REST API. Provide the API name asServiceNowAPIand the context as/servicenowand click on Create.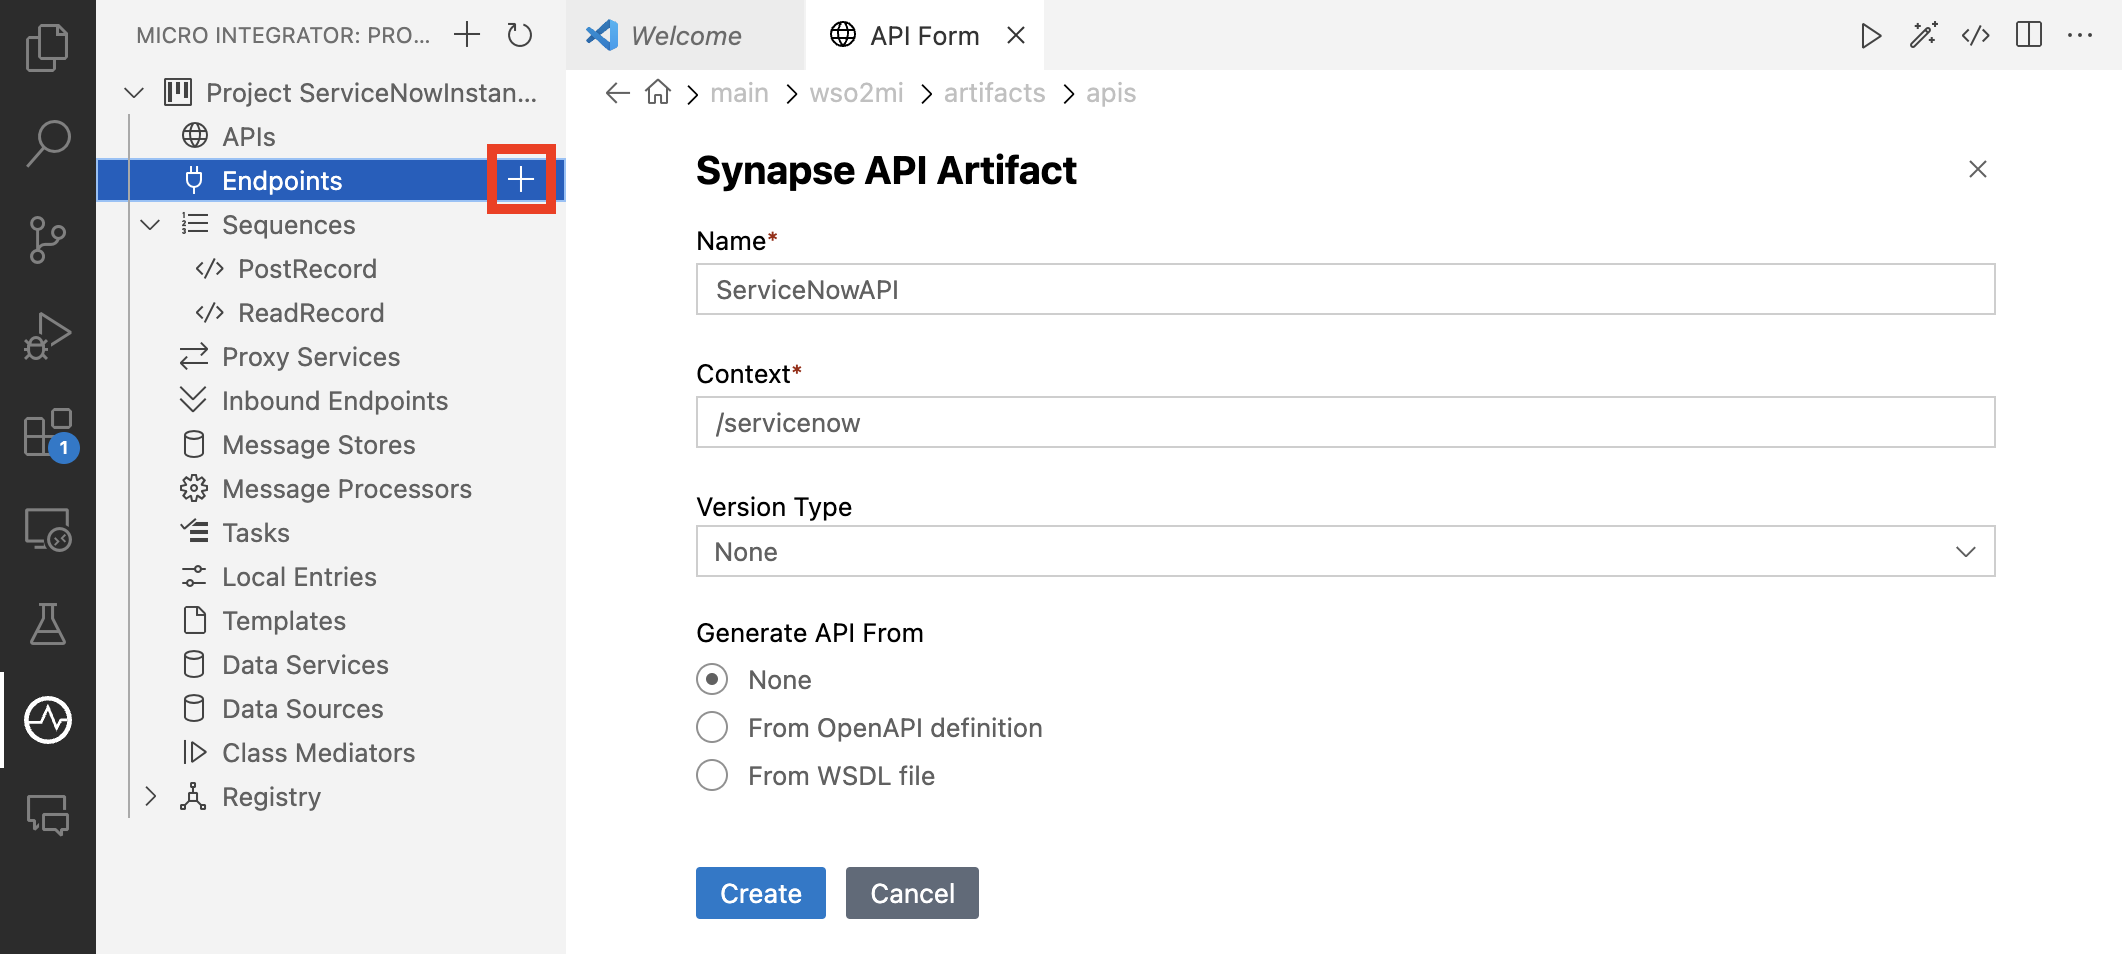
-
Click on the Service Designer and edit the added resource method and enter the following details as shown in the images below.
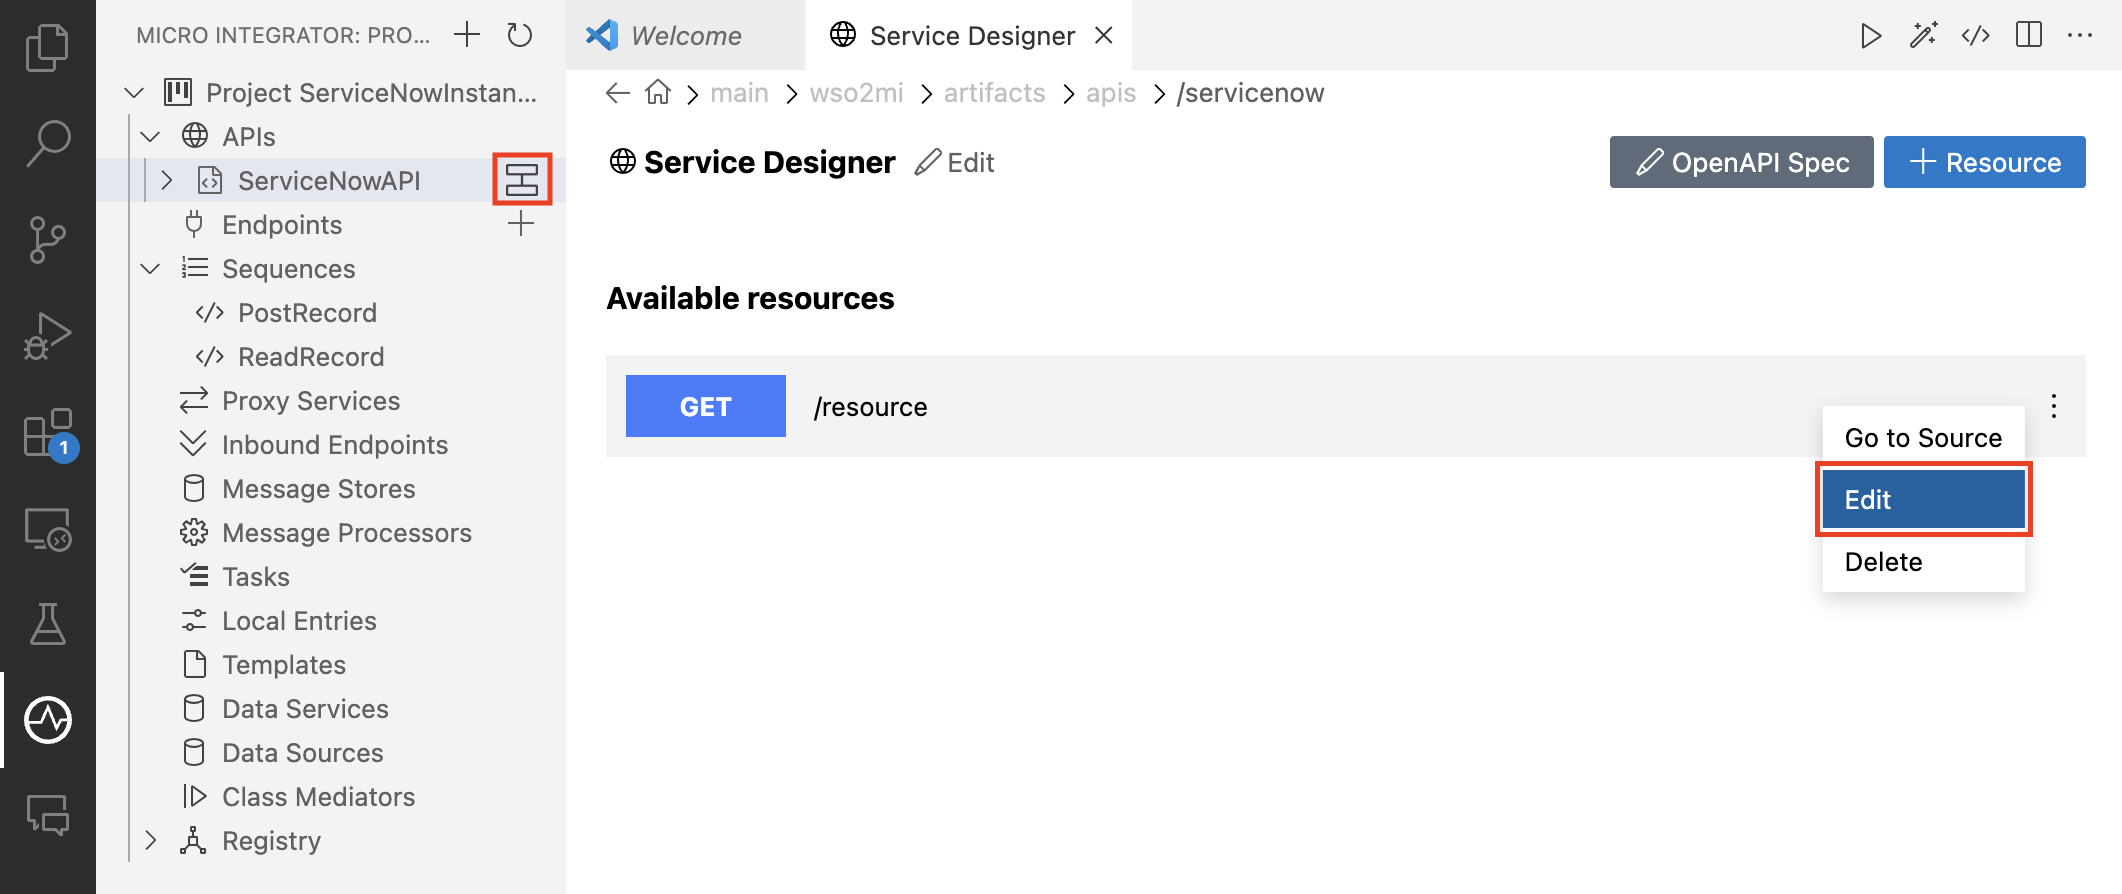
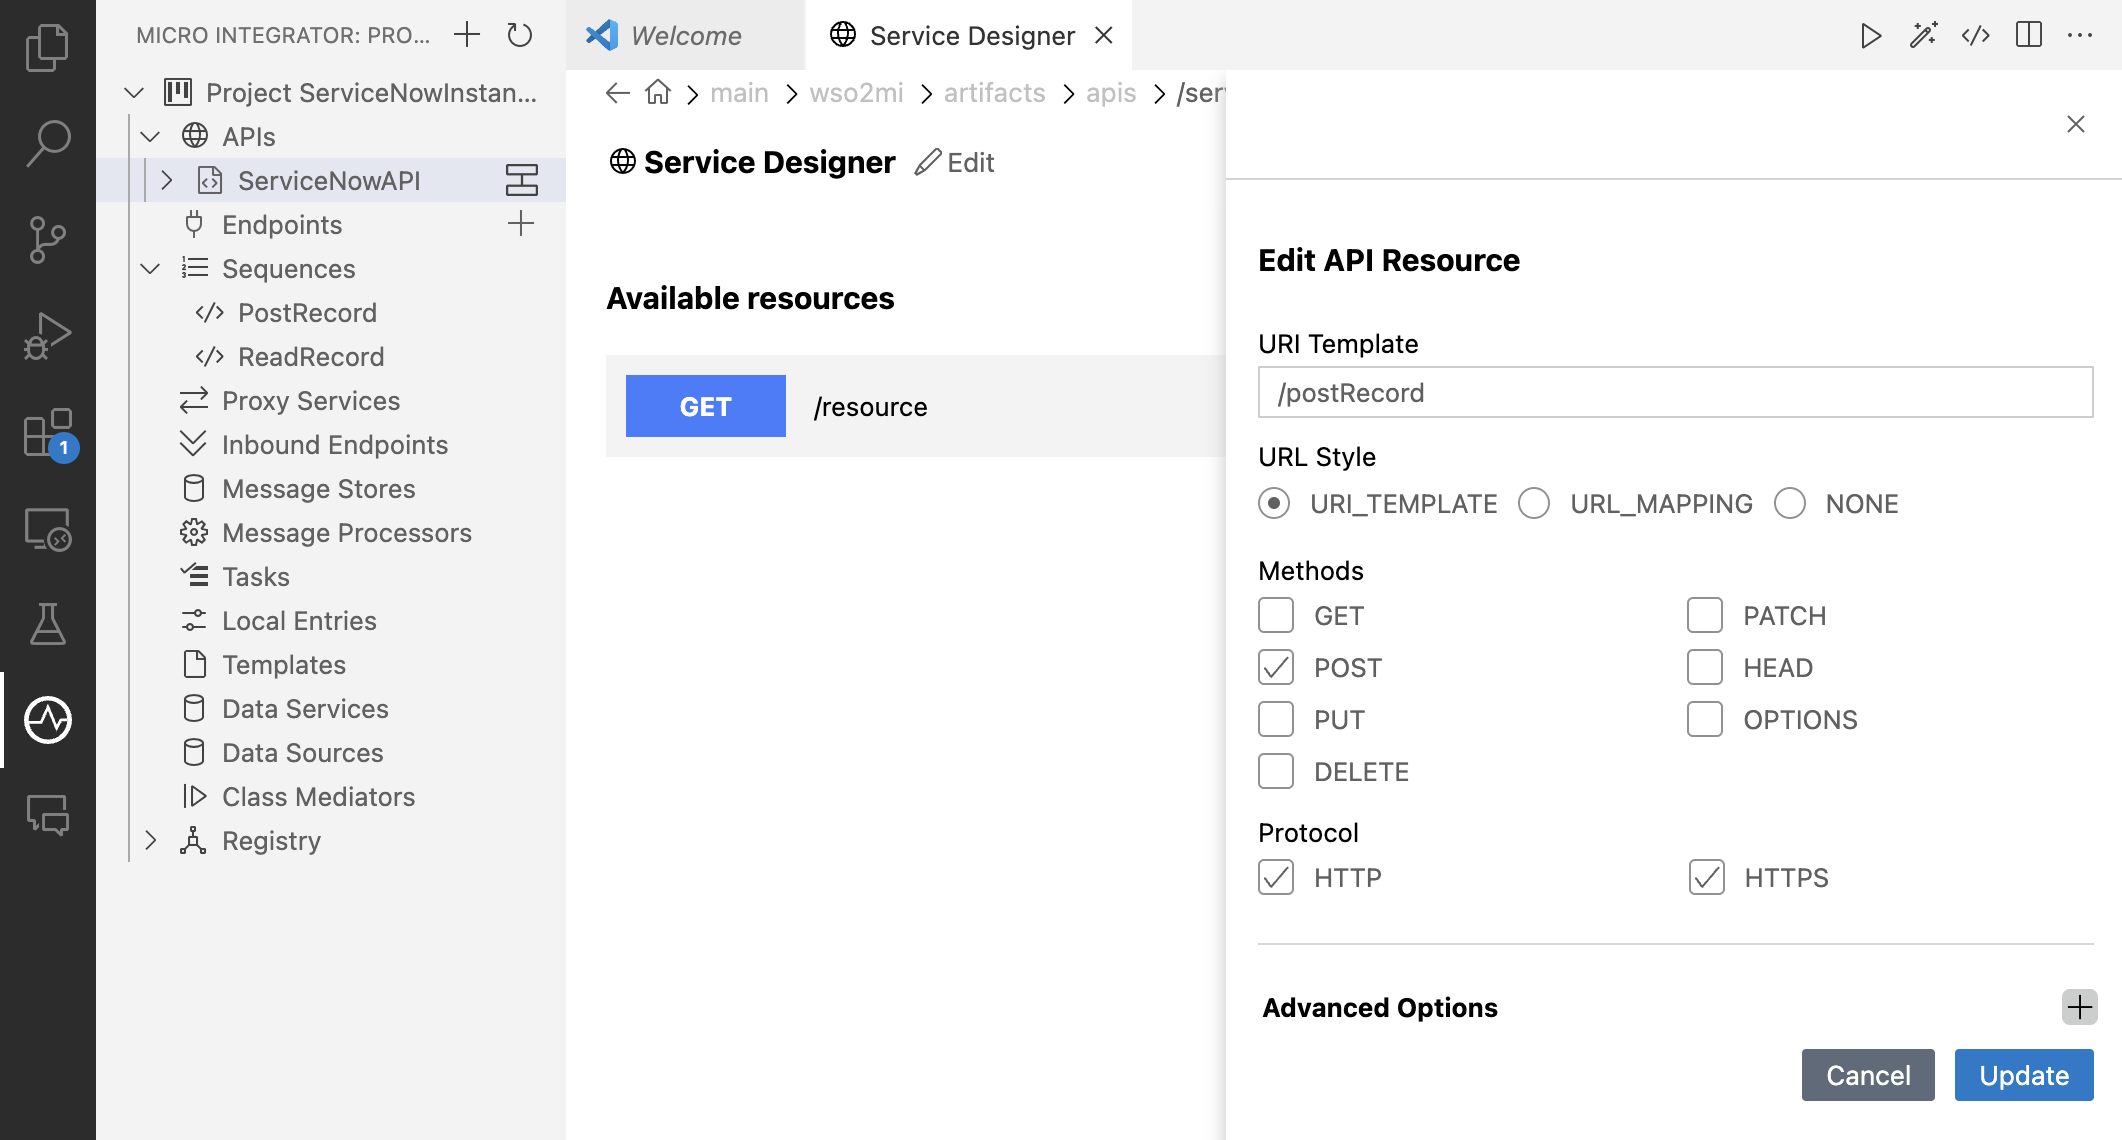
-
Add another API resource by clicking on
+ Resourcefrom the Service Designer and enter the following details.Property Value URL Style URI_TEMPLATEURI Template /readRecordHTTP Method POSTProtocol HTTP, HTTPS -
Let's update the
/postRecordresource with the required mediation logic. Click on the/postRecordto open the graphical view and a property mediator with the following details.Property Value Property Name shortDescriptionProperty Scope defaultProperty Data Type STRINGProperty Action SetProperty Value json-eval($.shortDescription)Make sure to select the EX button in the Property Value and Click on Submit.
-
Add another property mediator with the following details.
Property Value Property Name contactTypeProperty Scope defaultProperty Data Type STRINGProperty Action SetProperty Value json-eval($.contactType)Make sure to select the EX button in the Property Value and Click on Submit.
-
Add a Call Sequence mediator and select the
PostRecordsequence as the Referring sequence. -
Add the Respond mediator to respond to the request.
The final mediation logic of the
/postRecordresource is shown below.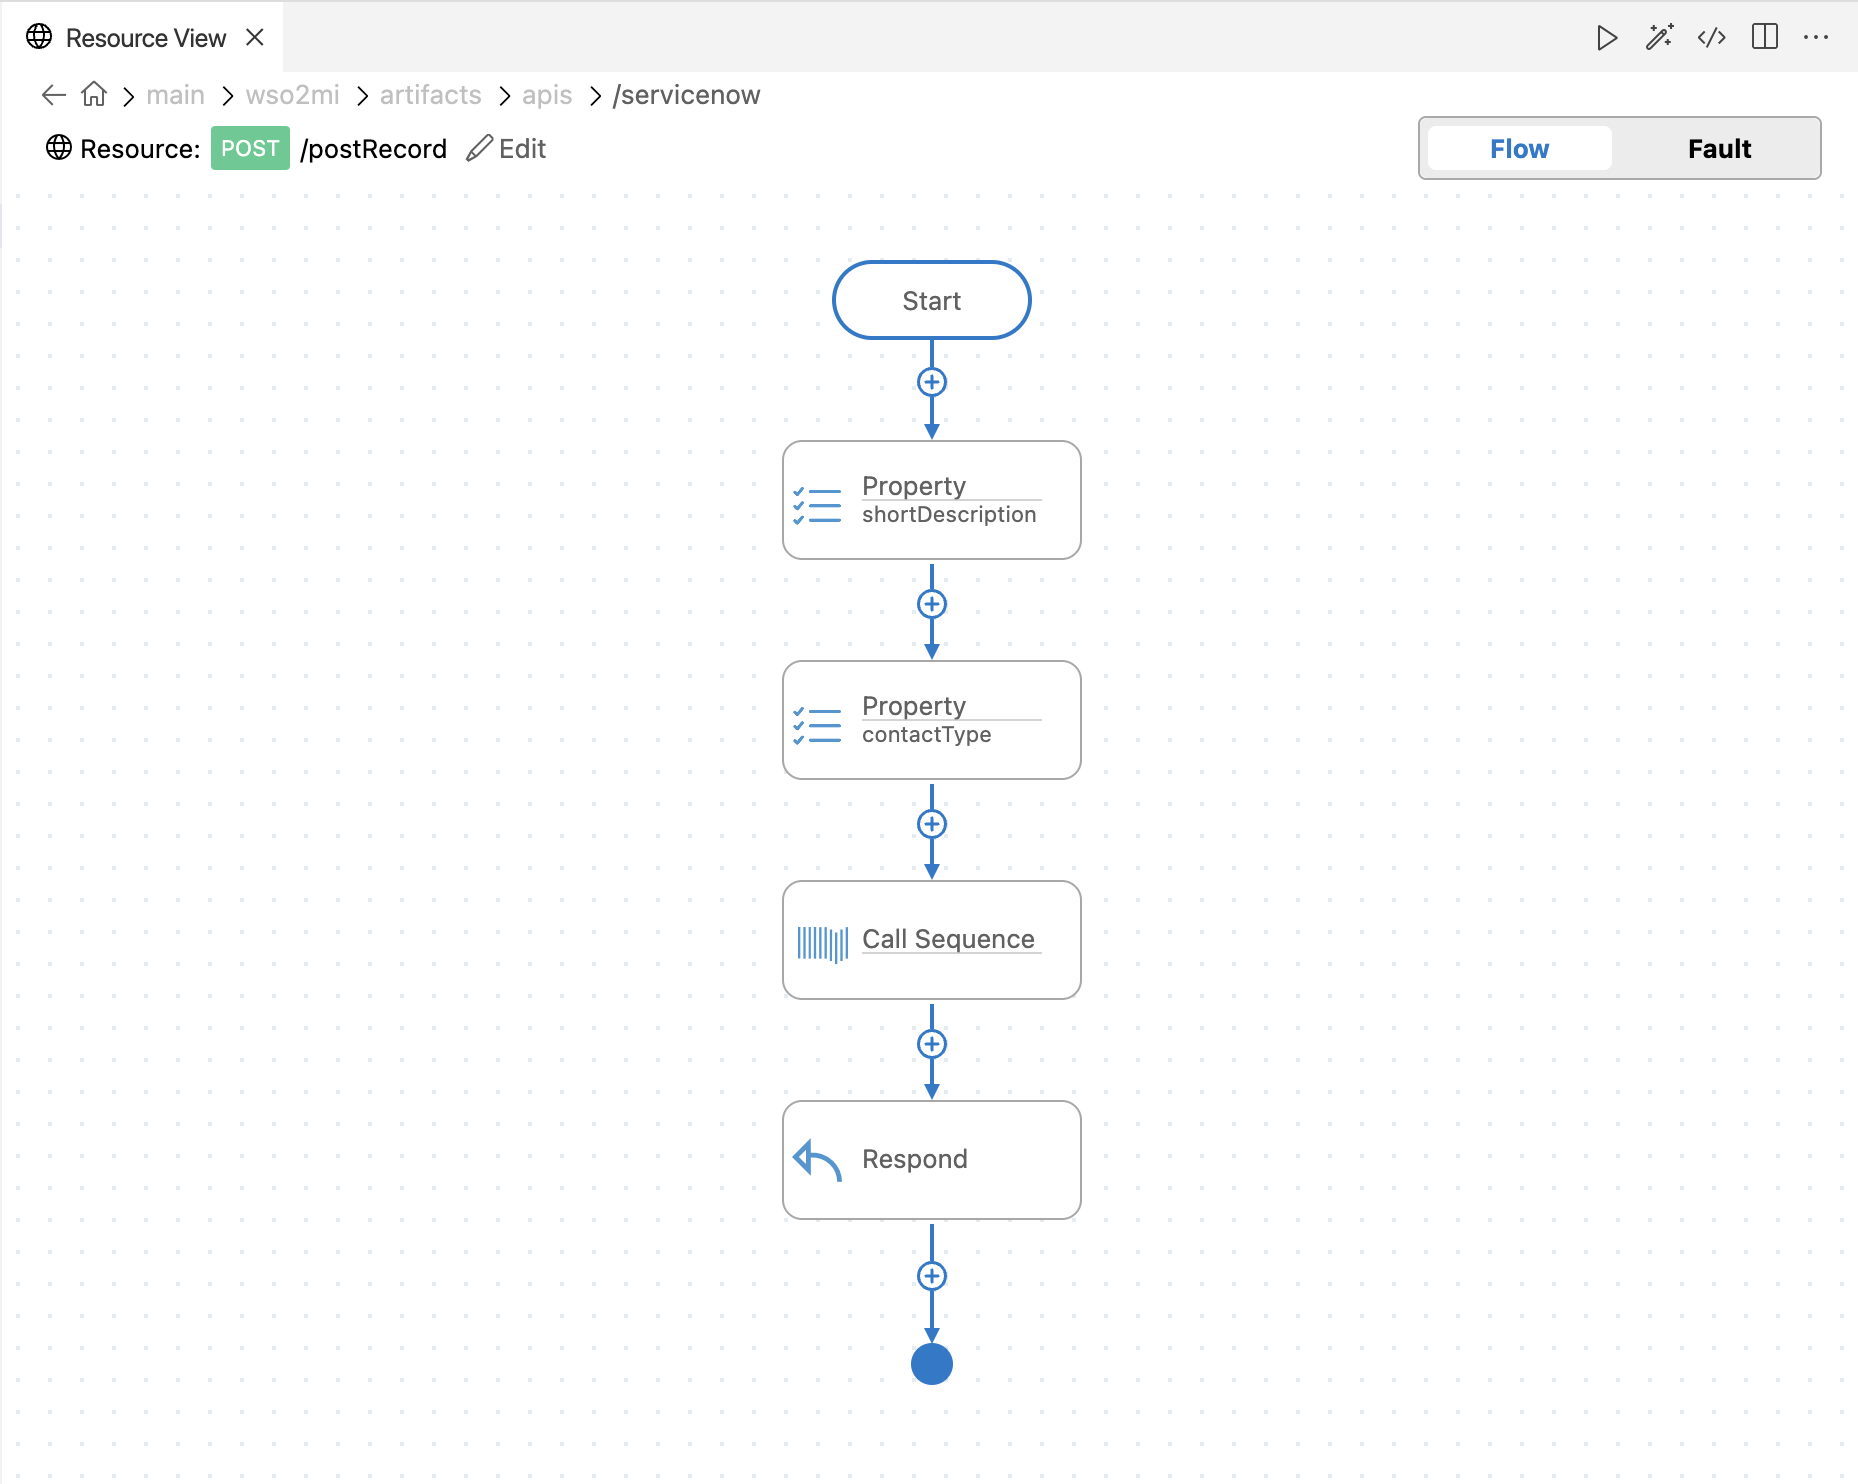
-
similarly, update the
/readRecordresource with the required mediation logic. Click on the/readRecordto open the graphical view and add a property mediator with the following details.Property Value Property Name sysIdProperty Scope defaultProperty Data Type STRINGProperty Action SetProperty Value json-eval($.sysId)Make sure to select the EX button in the Property Value and Click on Submit.
-
Add a Call Sequence mediator and select the
ReadRecordsequence as the Referring sequence. -
Add the Respond mediator to respond to the request.
The final mediation logic of the
/readRecordresource appears as shown below.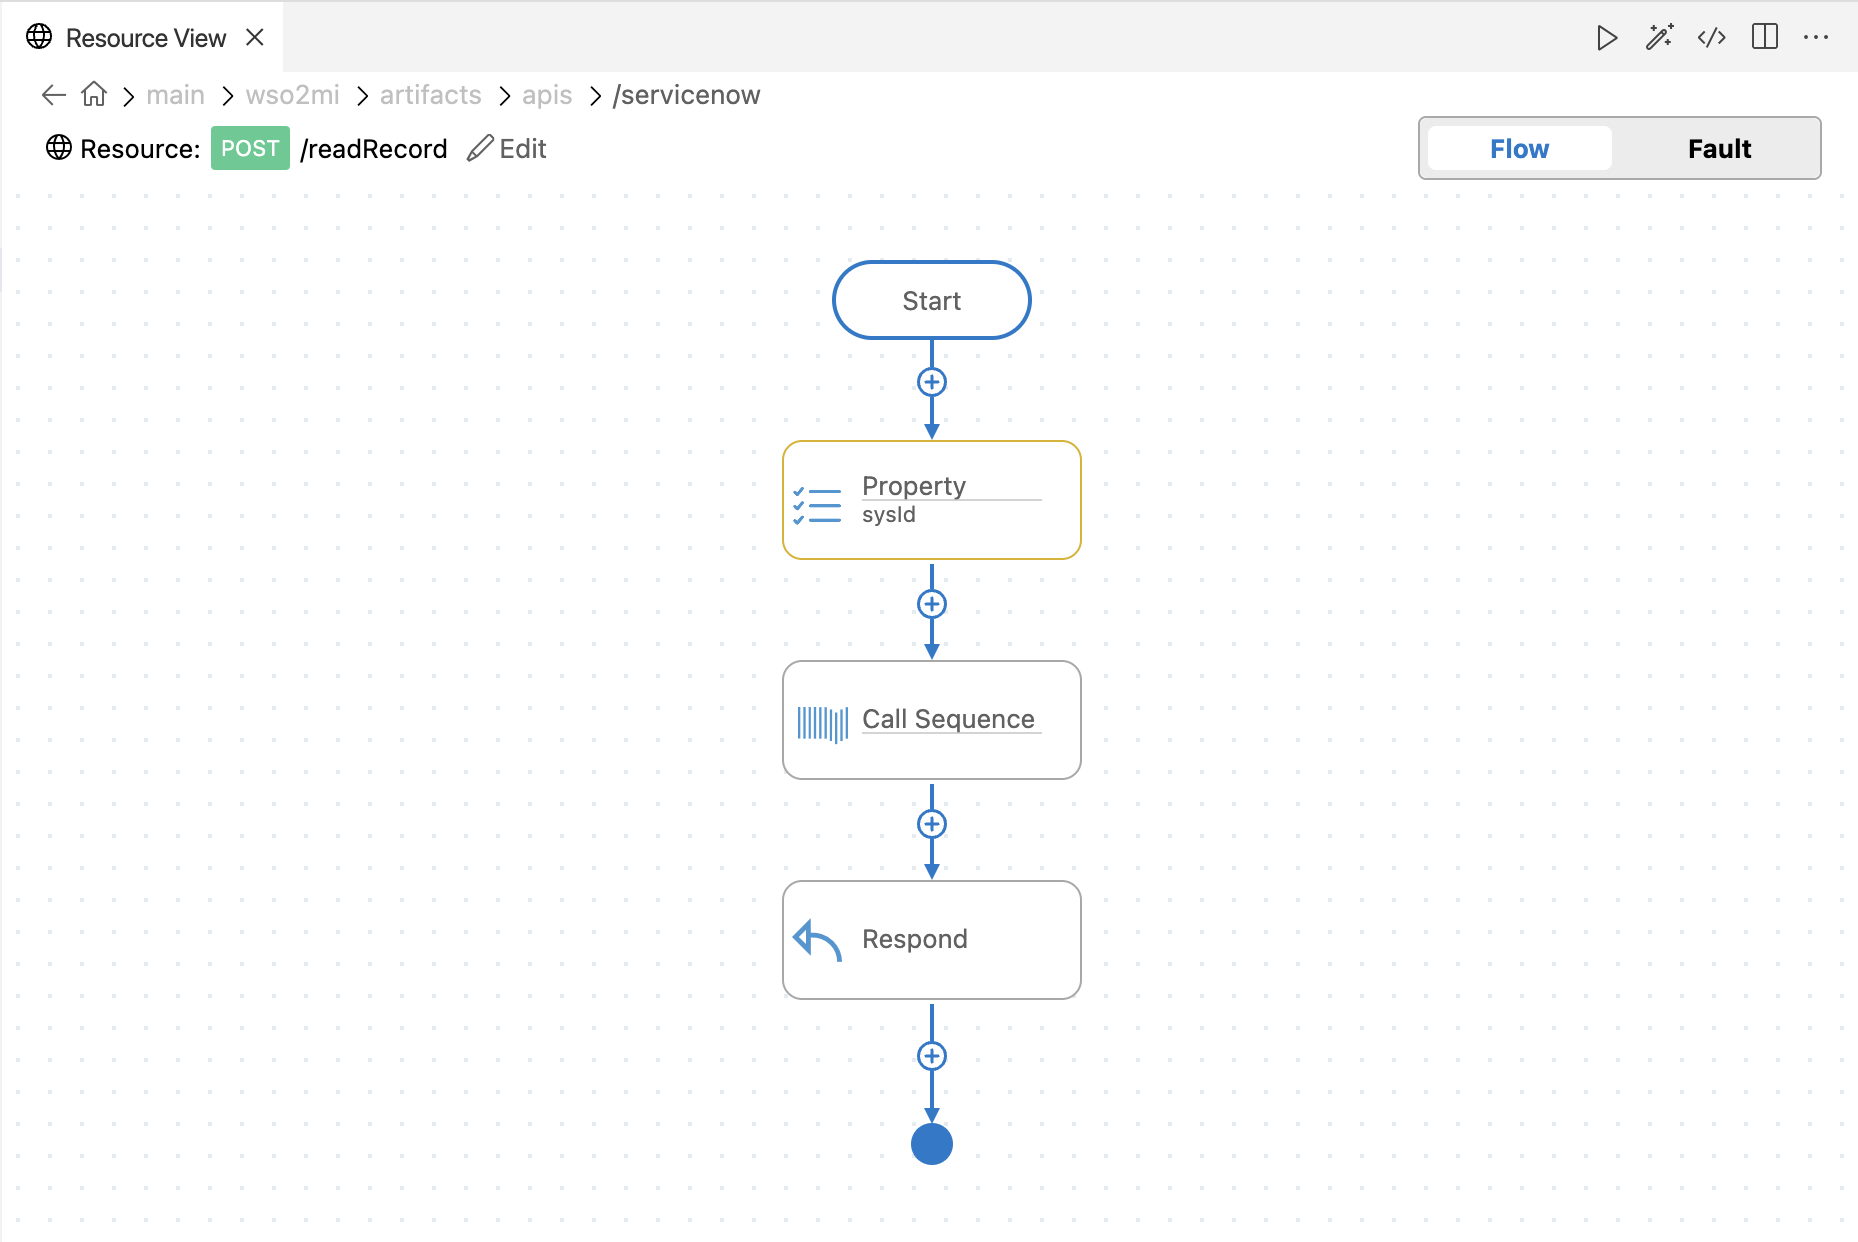
-
Now you have created the REST API with the required resources and mediation logic. You can view the source view of the API configuration as shown below.
<?xml version="1.0" encoding="UTF-8"?>
<api context="/servicenow" name="ServiceNowAPI" xmlns="http://ws.apache.org/ns/synapse">
    <resource methods="POST" uri-template="/postRecord">
        <inSequence>
            <property name="shortDescription" scope="default" type="STRING" expression="json-eval($.shortDescription)"/>
            <property name="contactType" scope="default" type="STRING" expression="json-eval($.contactType)"/>
            <sequence key="PostRecord"/>
            <respond/>
        </inSequence>
        <faultSequence>
        </faultSequence>
    </resource>
    <resource methods="POST" uri-template="/readRecord">
        <inSequence>
            <property name="sysId" scope="default" type="STRING" expression="json-eval($.sysId)"/>
            <sequence key="ReadRecord"/>
            <respond/>
        </inSequence>
        <faultSequence>
        </faultSequence>
    </resource>
</api>
Export integration logic as a CApp
In order to export the project, refer to the build and export the carbon application guide.
Get the project
You can download the ZIP file and extract the contents to get the project code.
Tip
You may need to update the instance details and make other such changes before deploying and running this project.
Deployment
In order to deploy and run the project, refer the build and run guide.
You can further refer the application deployed through the CLI tool. See the instructions on managing integrations from the CLI.
Test
Post record operation
- Create a file called data.json with the following payload. You can further refer to the parameters from here.
{ "shortDescription":"Incident type: L2", "contacttype":"email" } - Invoke the API as shown below using the curl command. Curl Application can be downloaded from [here] (https://curl.haxx.se/download.html).
Expected response: You should get the following response with the 'sys_id' and keep it saved.
curl -H "Content-Type: application/json" --request POST --data @data.json http://localhost:8290/servicenow/postRecord{ "result": { "short_description": "Incident type: L2", "number": "34", "sys_id": "fd7e0271073f801036baf03c7c1ed0ff" } }
Read record operation
- Create a file called data.json with the following payload. Make sure you paste above saved sys_id as the sysId below.
{ "sysId":"fd7e0271073f801036baf03c7c1ed0ff" } - Invoke the API as shown below using the curl command. Curl Application can be downloaded from [here] (https://curl.haxx.se/download.html).
curl -H "Content-Type: application/json" --request POST --data @data.json http://localhost:8290/fileconnector/readrecord
Expected response: You should get the following text returned.
{
    "result":{
        "parent":"",
        "made_sla":"true",
        "caused_by":"",
        "watch_list":"",
        "upon_reject":"cancel",
        "sys_updated_on":"2020-03-27 17:45:43",
        "child_incidents":"0",
        "hold_reason":"",
        "approval_history":"",
        "number":"34",
        "resolved_by":"",
        "sys_updated_by":"admin",
        "opened_by":{
          "link":"https://dev55707.service-now.com/api/now/table/sys_user/6816f79cc0a8016401c5a33be04be441",
          "value":"6816f79cc0a8016401c5a33be04be441"
        },
        "user_input":"",
        "sys_created_on":"2020-03-27 17:45:43",
        "sys_domain":{
          "link":"https://dev55707.service-now.com/api/now/table/sys_user_group/global",
          "value":"global"
        },
        "state":"1",
        "sys_created_by":"admin",
        "knowledge":"false",
        "order":"",
        "calendar_stc":"",
        "closed_at":"",
        "cmdb_ci":"",
        "delivery_plan":"",
        "contract":"",
        "impact":"3",
        "active":"true",
        "work_notes_list":"",
        "business_service":"",
        "priority":"5",
        "sys_domain_path":"/",
        "rfc":"",
        "time_worked":"",
        "expected_start":"",
        "opened_at":"2020-03-27 17:45:43",
        "business_duration":"",
        "group_list":"",
        "work_end":"",
        "caller_id":"",
        "reopened_time":"",
        "resolved_at":"",
        "approval_set":"",
        "subcategory":"",
        "work_notes":"",
        "short_description":"Incident type: L2",
        "close_code":"",
        "correlation_display":"",
        "delivery_task":"",
        "work_start":"",
        "assignment_group":"",
        "additional_assignee_list":"",
        "business_stc":"",
        "description":"",
        "calendar_duration":"",
        "close_notes":"",
        "notify":"1",
        "service_offering":"",
        "sys_class_name":"incident",
        "closed_by":"",
        "follow_up":"",
        "parent_incident":"",
        "sys_id":"fd7e0271073f801036baf03c7c1ed0ff",
        "contact_type":"",
        "reopened_by":"",
        "incident_state":"1",
        "urgency":"3",
        "problem_id":"",
        "company":"",
        "reassignment_count":"0",
        "activity_due":"",
        "assigned_to":"",
        "severity":"3",
        "comments":"",
        "approval":"not requested",
        "sla_due":"",
        "comments_and_work_notes":"",
        "due_date":"",
        "sys_mod_count":"0",
        "reopen_count":"0",
        "sys_tags":"",
        "escalation":"0",
        "upon_approval":"proceed",
        "correlation_id":"",
        "location":"",
        "category":"inquiry"
    }
}
What's next
- To customize this example for your own scenario, see ServiceNow Connector Configuration documentation for all operation details of the connector.


